
How to Automatically Schedule Content Updates in WordPress
Have you ever tried scheduling a content update in WordPress? If you did, then you likely discovered that there is no easy way to schedule changes to a published post or page. In this article, we will show you how to easily schedule content updates in WordPress and improve your editorial workflow.
Why Schedule Updates for Posts and Pages in WordPress?
By default, WordPress allows you to schedule posts to be published at a specific time. However, you cannot schedule content updates for a post or page that is already published.
Many bloggers and website owners frequently make changes to their old blog posts, so they can keep their article up to date by adding new information.
Business websites may want to make scheduled changes to appear at a certain time. For example, when you are running a sales event or limited time promotional offer.
Normally, you will have to make changes at the exact time you want them to appear. Your changes become live as soon you hit the update button. Some site owners save their changes as a draft and then copy / paste them at the right time.
Wouldn’t it be nice if you can schedule your content updates just like you would schedule new posts and pages?
Let’s take a look at how to easily schedule content updates in WordPress to improve your workflow and keep your old content fresh.
Scheduling Content Updates in WordPress
The first thing you need to do is install and activate the Tao Schedule Update plugin. For more details, see our step by step guide on how to install a WordPress plugin.
Upon activation, you need to visit Posts » All Posts page in the WordPress admin area. From here you can locate the post where you want to schedule changes and then click on the ‘Scheduled Update’ link.
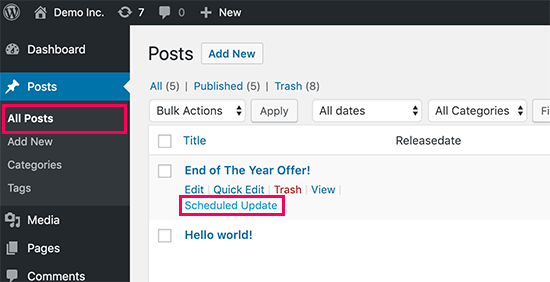
The plugin will create a draft copy of your original post and open it in the post editor. You can now make changes to your post.
Once you are done editing, click on the date and time next to the ‘Publish’ option.
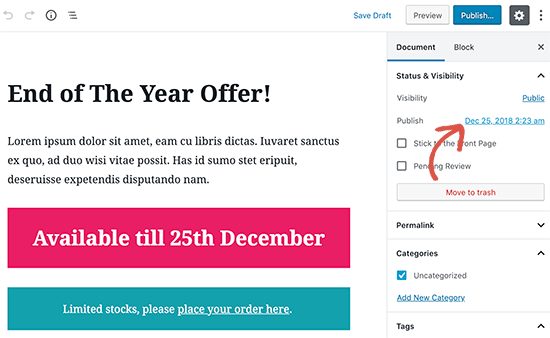
This will show the date and time settings. You need to enter the date and time when you want your changes to go live and then click on the ‘Schedule’ button at the top right corner of the screen.
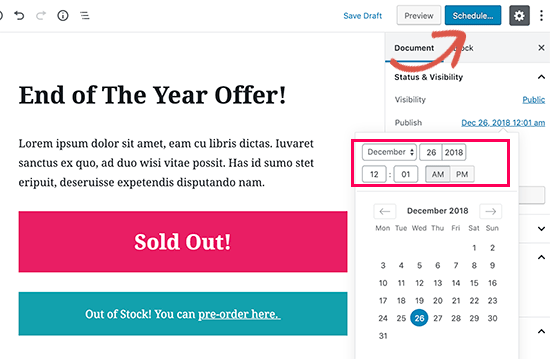
Your changes will now be scheduled and will be published automatically at the date and time you entered.
Scheduling Content Updates in Classic Editor
If you are using the older classic editor, then you will see a new meta box in the right column labeled ‘Scheduled Update’
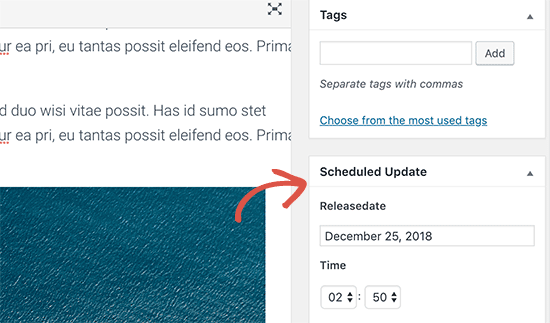
From here you can select the date and time and when you want to publish the changes. After that, you can schedule your changes by clicking the ‘Save’ button under the publish meta box.
Viewing and Managing Scheduled Post Updates
You can manage your scheduled post updates from the Posts » All Posts screen. All scheduled updates will be highlighted with their set release date.
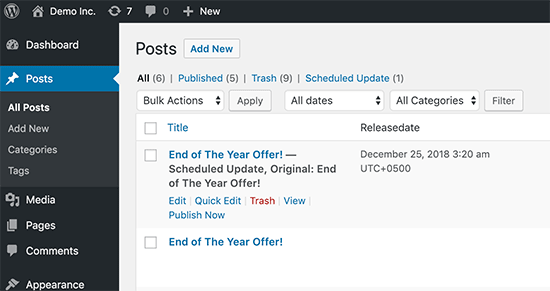
From here you can delete or modify a scheduled update without affecting your original post. You can also immediately publish an update by clicking on the ‘Publish now’ link.
We hope this article helped you learn how to properly schedule content updates in WordPress. You may also want to see our tips on growing your website on a shoestring budget.
If you liked this article, then please subscribe to our YouTube Channel for WordPress video tutorials. You can also find us on Twitter and Facebook.
The post How to Automatically Schedule Content Updates in WordPress appeared first on WPBeginner.
